Stop Motion
Welcome to my portfolio dedicated to stop-motion animation. Here, you will find a comprehensive collection of my work, including films, commissioned projects, and personal endeavours.
Feel free to explore the various offerings below. Should you have any inquiries regarding commissions or potential roles that might be available, please do not hesitate to reach out.
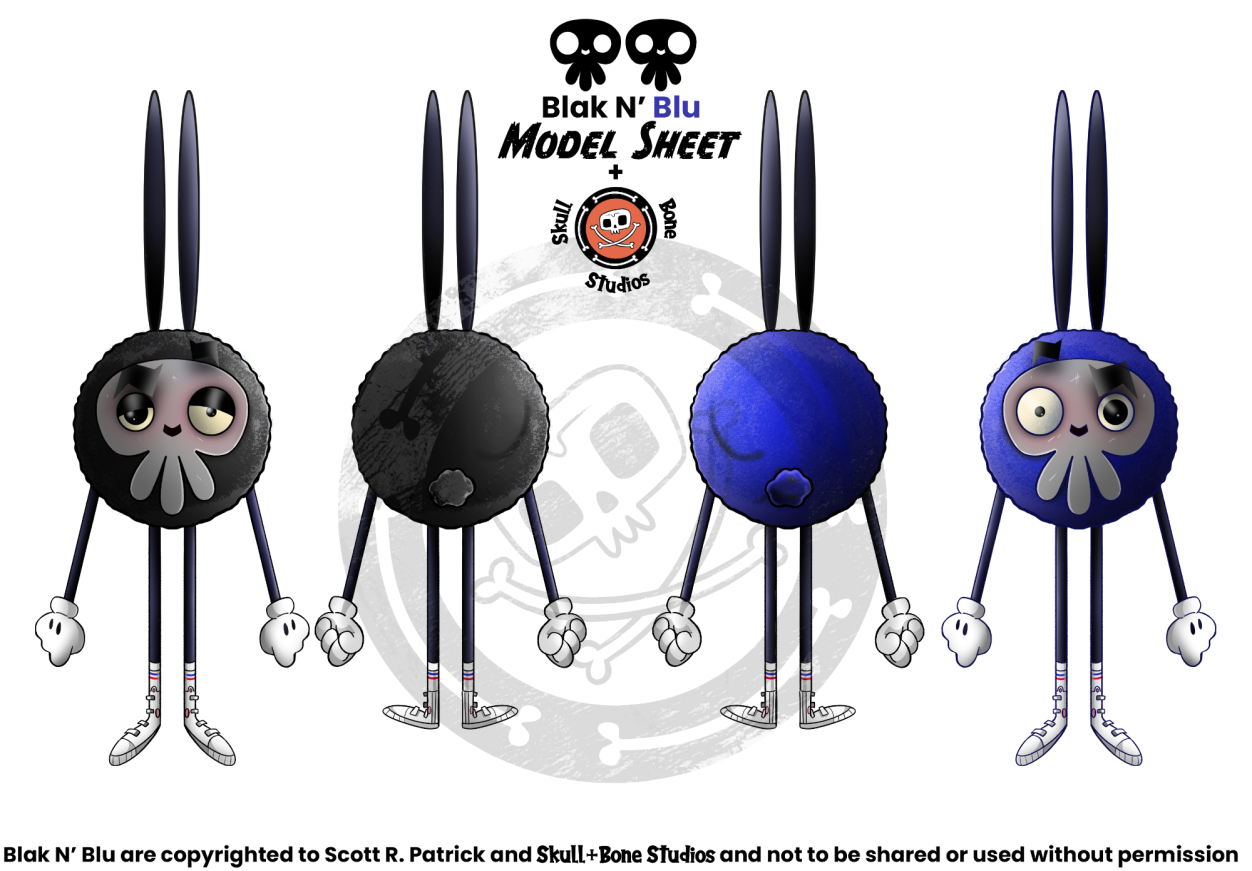
I am pleased to announce my current collaboration with a colleague Anthony Middleton on a personal stop-motion project entitled "Blak N' Blu." Our objective is to provide a deeper understanding of the creative process by sharing behind-the-scenes images, videos, and tutorials. We are in the process of establishing our social media presence and website to keep you informed about our latest developments and content. Furthermore, we will soon be launching a crowdfunding initiative to secure financial support for our project. Please stay tuned for forthcoming updates.

Sneek Peek Blak N' Blu Character Turnaround
Mum's Spagetti by Lisa Kenny
MC mastermind Poppy and her beatboxing border terrier Snoop are the new kids in town - and they're ready to make their reputation known. Straight A's and bubble baths are their way of life - but when confronted by an older crew en-route to her first day at school, Poppy quickly changes her tune.
Role: Background Character Puppet Armature Fabrication
Drums by Rich Harris
Ever since she was a child, Robin loved playing the drums. As she grew up she continued to improve, eventually making it to the big stage. Now, a few years later, the drumming dream has turned sour and Robin is blaming the drum kit that she once loved. She decides getting rid of the drums is the only way she can move on with her life. On a journey of self-discovery and unexpected obstacles, Robin will question whether she is really ready to give up her passion.
Role: Second Armature for Main Character
I was contacted by animation director Rich Harris to make an armature that was a bit more flexible for playing the drums in his film 'From the Top'. Must of the main characters were made from armature wire, but Rich wanted more flexible puppet for the drumming scenes. I set to work designing a simple puppet on a limited budget that would give the animator more control over the puppets gestures when animating.
Two Black Boys in Paradise by One 6th Studios
Two Black boys go on a journey of self-acceptance. Their love for each other and their refusal to hide it lands them in a paradise free of shame and judgement.
Role: Additonal Characters Armatures
Arts University Plymouth
I was commissioned by Arts University Plymouth to make some stop motion characters heads to be used by students on the animation course. They had already purchased the Anibuild Heads from Animationtool Kit, but were looking for somebody to help customise the heads that would allow the students to bring the characters to life to help them practice stop motion acting with real puppets. Each puppet had to be robust and handle quite a lot of wear and tear. Each puppet was sculpted epoxy sculpt for its durability and toughness.
Each puppet had customised eye blinks and magnetised eyebrows for movement. A set of different sized pupils and magnetised mouth shape to allow the students to design and build there own custom mouth shapes to practise lip syncing with the heads.
Yellow Mouse Studios
Here are a selection of stop motion projects I worked on while working with Dan Willers over at Yellow Mouse Studios (YMS). The first is a lego Avengers animation, I did all the pre-production, animating and set building and post production work by myself. This was so much fun to work on and Dan gave my free reigns to do what I wanted and to push myself to see what I could achieve.
The Second animation was made within an hour, this was for YMS social media. Using a real pumpkin I carved out in expression as I animated, then in post production edited the frames to make it look like the pumpkin was blinking.
The stop motion animation was made once again for YMS social media to celebrate the studios 6yrs anniversary. It was made in two days, using clay puppets designed, fabricated and animated by me.

Avengers Lego
This was a great test starter project that I worked on at Yellow Mouse Studios. Dan Willers creative director at YMS, gave space to create a project that would give me real world practice of animating a large stop motion project.
Halloween
This stop motion was made in a few short hours using a real pumpkin. The pumpkin was hand carved to animate the smile and blink. It was a fun project to work on to see what could be achieved in just a few hours.
YMS Anniversary
Once again this was a quick turnaround animation to celebrate YMS 6th year anniversary being a independent studio. I made some simple clay characters and a prop cake and animating those on a glass work top.
Spot Light Puppet Build: Citro
Citro is one of two characters I developed for my final major project (FMP) as part of my animation degree at Arts University Plymouth. My objective was to explore the feasibility of replicating the Rapid Prototype 3D printing techniques employed by renowned studios such as Laika and Shadowmachine, all while adhering to a constrained student budget. T
his endeavour was particularly challenging due to the COVID-19 pandemic, which restricted access to university workshops and complicated the sourcing of materials and components necessary for constructing the two puppets. The process involved extensive research, during which I sought guidance from professionals in the stop-motion industry. I am profoundly grateful for their generosity in sharing their expertise and insights.
A pivotal resource in my research was "The Art of ParaNorman," which I consulted daily to enhance my understanding of the methodologies utilized by Laika in puppet creation. Throughout the project, I documented each stage meticulously, capturing thousands of photographs and videos, and I composed a comprehensive essay detailing the entire process. Below are a selection of photographs from this journey. I will soon include images of the second puppet I created.
If you are a university student pursuing studies in stop-motion animation and wish to inquire further, please feel free to reach out via my contact form. I kindly ask for your patience, as I receive a substantial volume of inquiries.
Puppet Head and Eye Mechanism Fabrication
Armature and Body Fabrication
Armature Test
This was a quick animation test I did of the armature, this was to see if the armature worked in holding the position when moved. I used a temporary foam made head as a reference point.
3D Head Model
Head explosion animation made in Blender. This animation was based on the Laika videos they do of their characters to show all the different parts inside the complex puppet heads.
Head Assembly
This was a test animation of the separate colour printed faces printed from the Stratasy J750 full colour 3D printer.
The only thing I could not do was seal the faces in superglue, this helps bring out the colour richer and makes the detail pop. But I could not get my hands on enough superglue needed to dip the heads fully into during the COVID lockdown.
3D Head Model
I always wanted to do a head explosion ever since I saw the Paranorman head explosion from Laika Studios. So has I based my work flow on producing a puppet based on Laika puppets - I just had to do one. I think this was my favourite thing to do.
Citro 2D Face Animation Test
I did a few 2D animated faces to see what I could do with the facial expressions of the character. In the end I did not get that faces printed as the cost of each face was quite high even with the huge discount given to me be the printing company.
Head Assembly
Head assembly time-lapse. It still amazes me that I got the puppet finished in the height of COVID. I did not appreciate it at the time because it didn't turnout exactly how I planned. But with the lockdown and with limited resources I still managed to finish two puppets. When I look back - I think I did quite well.
Citro Finished Puppet Turnaround
Final finished puppet of Citro.
Puppet Build: Death
This document pertains to the second character I developed for my final major project (FMP) as part of my animation degree at Arts University Plymouth. For this puppet, I aimed to employ traditional techniques for casting the head in resin, all while adhering to the constraints of a limited student budget.
The creation of this puppet took place during the COVID-19 pandemic, which posed significant challenges, particularly in terms of accessing university workshops and sourcing the necessary materials and components for constructing two puppets.
The process involved extensive research, and I sought guidance from professionals within the stop-motion industry, whose generosity in sharing their expertise I deeply appreciate. My objective was to design a walking rig system similar to that utilised in "Corpse Bride." The original rig, crafted by Andy Gent of Arch Model Studios, was ingeniously concealed beneath the character's dress and employed a lab scissor lift to facilitate movement along the Z-axis, thereby simulating walking. I endeavoured to refine this design and create a more compact rig.
The head was cast and molded using various techniques that have remained largely unchanged since the era of Ray Harryhausen. My research was thorough, with "The Art of the Corpse Bride" serving as a primary resource. Throughout the process, I documented each stage meticulously, capturing thousands of photographs and videos, and I composed a detailed essay outlining the entire procedure. Below, I have included a selection of photographs.
Should you be a university student pursuing studies in stop-motion animation and wish to inquire further, please do not hesitate to reach out via my contact form. Kindly allow some time for my response, as I receive a considerable volume of emails.
Puppet Head and Hands Fabrication
Death Body Fabrication with Walking Rig
Scythe Prop Fabrication and Final Death Puppet
Death Test: One
Death Test:
Two
Death Test:
Three
Death Final Finished Puppet Turnaround
Poor, Poor Stephen Seagull
My fascination with seagulls, characterized by their distinct personalities and nonchalant demeanor, inspired the creation of a short animation centered around these captivating birds. This project served as my inaugural foray into stop motion animation, presenting a significant challenge that I embraced wholeheartedly. The timeline for completion was set at three months; however, midway through the production, I sustained a wrist fracture during a snowboarding accident, which further complicated the making of this project.
The puppets were crafted utilising a blend of traditional and contemporary puppet-making techniques, including casting and moulding, 3D printing (with beaks designed and produced using Blender), and the assembly of silver soldering ball joints and armatures. This project marked my initial experience in producing functional puppets, from which I gained considerable knowledge and skills. The animation process spanned two weeks in a small studio during the peak of summer. The studio lacked air ventilation and featured a blacked-out window, resulting in sweltering conditions that were reminiscent of an oven.
During the first week, I animated the two puppets while wearing a cast on my injured arm, which proved to be particularly challenging, especially with the smaller baby puppet, as accessing it was difficult. Fortunately, the cast was removed during the second week. The extreme heat often caused the black rubber eye pupils to detach, as they were affixed to the eyes using Vaseline, which melted under the hot conditions. I frequently lost these eye components and had to maintain a fresh supply on hand for replacements during the shoot.
In conclusion, I am quite satisfied with the final outcome of this film. Some scenes were ultimately omitted to enhance the overall flow of the animation, and the project underwent a title change from "Poor, Poor Seagull" to "Poor, Poor Stephen Seagull," a pun that I found irresistible.
Seagull Puppet Fabrication
Storyboard Animatic
This is the original animatic made from the storyboard. You can see some of the original shots that got left on the editing floor in the animatic.
3D Model Beak Turnaround
I decided early on to experiment with replacement animation for the beaks. I made the beaks in Blender and then printed them off in resin. I sanded and primed the beaks before spraying each one yellow and paint the inner mouth black and the tongue red. I used red nail polish to give the tongue a wet look.
Animation Timelapse
I love making time-lapse of me animating, they are so much fun to play back and see yourself animating but also see the characters move at the same time.
Behind the Scenes footage
This was me animating on the very small set. The scene is of the baby seagull running around the adult seagull. Animating two characters in a scene can be quite tricky keeping track of individual timings.
Rehearsal Test Shot
I would often do a rehearsal take shot on fours, then do one normal pass. This allowed me to make any final adjustments to the animation. I often did not have time for rehearsal shots, but the animation always comes out better when you do have time to rehearse.
Animating Puppets on Set
Timelapse of me animating. I had just got my cast off my arm and had saved the most complex shots for the last. Without the cast on my left wrist I could animate more freely.
Poor, Poor Stephen Seagull
Final Finished Film
Concept Maquettes and Sculptures
Concept to Conception
Here a few fun sculptures, maquettes for proof of concept pieces and props for projects that I have worked on.
Winder Rig
The costs associated with equipment and materials in stop motion animation are widely recognised within the industry. Many of the necessary tools can often be fabricated using readily available materials, allowing for a degree of customisation. Among these tools, the winder rig is a vital component of stop motion setups. However, replicating the precision and control offered by a professional-grade rig with a homemade alternative can prove challenging; moreover, professional rigs tend to be quite costly.
While some stop motion practitioners have developed their own versions, I strongly recommend conducting thorough research to explore these options. During my final year of university, the onset of the COVID-19 pandemic severely limited my access to essential materials and equipment, which posed significant challenges for my stop motion projects. Additionally, I encountered difficulties in locating a winder rig within a constrained budget, as the university's resources were lacking at that time (I understand they are now available). The majority of commercially available rigs were prohibitively expensive, prompting me to undertake the challenge of constructing my own within a budget of £30.
I began by designing a winder rig based on the standard model, sourcing most of the components affordably through eBay. I made the main casing in a free CAD software called 123D Design, sadly this is no longer available. But you can do the same in Blender and Tinker CAD which are free. The 3D printing of certain parts was expertly handled by two fellow university students, Char Wolf and Anthony Middleton. The assembly of the components was straightforward. Although I did not have the opportunity to utilise this rig for my university project, I successfully adhered to the £30 budget. Subsequently, I employed the rig for various other projects, and it performed admirably as a homemade winder rig. Examples of its application can be seen below. Currently, there are more commercially available options than there were at the time of my search, including the highly regarded Animation Toolkit winder rig. However, should you wish to attempt constructing your own, please feel free to contact me. I would be happy to share the design files and provide guidance on sourcing the necessary components.
3D Printed Casing
Winder Rig in Action
We need your consent to load the translations
We use a third-party service to translate the website content that may collect data about your activity. Please review the details in the privacy policy and accept the service to view the translations.


